An image is worth a thousand words.
You've probably heard that a thousand times
and it's sweet...
but the truth of the matter is
you want your image to
grab people by the eyeballs
and keep them focused on what you're saying.
So everything needs an image. Everything.
That's why facebook posts with images get shared and blogs with great images get pinned.
Try to make every post have a graphic. If you don't have one, create one with PicMonkey.com. It's quick and easy once you get the hang of it.
First I'll show you how to create a 400x400 blank for quotes if you don't have an image.

Go to PicMonkey.com and choose Create a Collage

On the left side, click to choose a collage layout.

Choose a two cell layout from the Ducks in a Row tab.

Delete one of the cells.

Unlock the proportions and set the size to 400x400

On the left side, click the painters palette icon to edit the background color.

Choose a color or enter a HEX# to match your branding

Click Save

Name your file and choose either JPG or PNG. Then choose the quality of the image. I chose the highest quality. Hit Save when you're done!
Now you have a background to create images with. The 400x400 size is nice for blog posts and will fit on your facebook page without being cut off. Let's add some text!
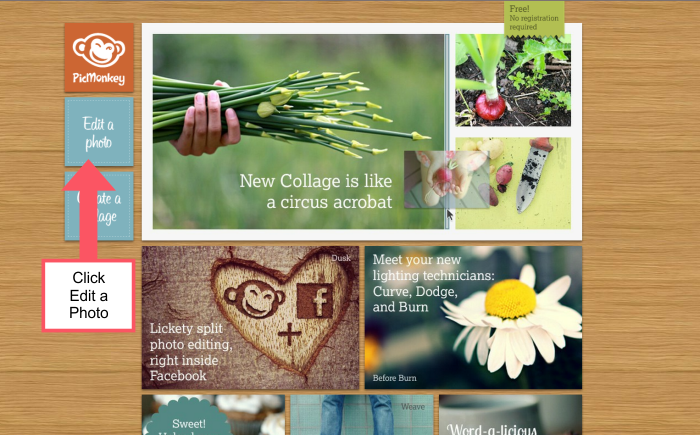
Again, go to the PicMonkey.com homepage

Choose to edit a photo
Choose the P icon on the left to add text to your graphic. You can change the color, font, and size. Add a second area of text if you want to add in a different font or different sized text. Make sure you add your url to the very bottom so people will know where the image came from. For mine, I made the color a bit transparent so it blended with the background a bit.

You can also add texture to your background. Have fun playing with the settings and be creative. You can make so many different styles of graphics by changing things up.

You can also add shapes to your image and make it any size. Add borders or add an image before you add your text and then add your text on top of it.

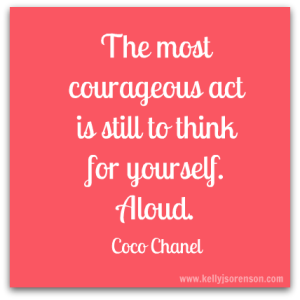
Add a drop shadow like in the image I created above, or colored borders, photo corners, film edging or even make your image into a circle. Have fun playing with these!

When you are done editing, hit the save button in the bottom left corner

Save the image to your computer. Choose a different name for it so you will be able to use your background over and over again. You can save the image as either a JPG or PNG file. If you choose JPG, choose the quality and then hit save!
Now you're ready to upload your image in your blog, facebook or google+.
Let me know if you have ANY questions! Now go play with PicMonkey!
...............................................................................
To keep up to date with what's new in the world of social media, be sure to sign up for the Branding and Beyond Newsletter:
I hope you enjoyed this tutorial! If you found it helpful, please share it with your friends using the links below :)


AWESOME! Love this! Thanks for sharing!
ReplyDeleteVery helpful! Thanks for sharing!
ReplyDeleteGreat post - I just discovered the collages function on PicMonkey the other day and love it. They include a template for FB cover images, too! It makes it a bit easier to create something that looks more expensive than free ;-). I hadn't thought about using it how you describe, and now I can't wait to try it out. Thanks!! ~Beth
ReplyDeleteWith the collage option, you can really make any size graphic you want by adjusting the size. I think this is awesome for businesses just starting out and on a tight budget. I'll be doing more PicMonkey tutorials in the future with some design pointers.
ReplyDeleteI'm glad you ladies liked the post :)Don't forget to let me know if you make a graphic so I can share it!
Kelly, here's my first one (of many, I'm sure ;-) ):http://pinterest.com/pin/90846117453885661/
DeleteThanks again!
Kelly , I can't figure out how to control the size of my text box. It is putting it into a very thin , verrryy wide box that goes outside the image. Aspect ratio is set and I can't resize it to what I want. help and thanks :)
ReplyDeleteBeverly, in the text box where you typed your text, you have to hit enter when you want a break in your text. If that isn't working, and I had someone else mention that it wasn't working for them, then you might have to create a separate text box for each line of text that you want.
Deletetks, I'll give it a try this weekend :)
DeleteLet me know how it goes! :)
DeleteThis is fantastic! Thank you!!
ReplyDeleteI'm now not certain the place you're getting your info, but great topic.
ReplyDeleteI must spend a while studying more or figuring out more.
Thanks for wonderful info I used to be on the lookout for this
information for my mission.
Here is my weblog Real Online jobs from home
My website - online work from home jobs
I have read so many articles on the topic of the blogger lovers
ReplyDeletehowever this post is truly a fastidious piece of writing, keep it up.
Also visit my weblog getting pregnant
Thanks for this info. I was able to make a Nautical sale sign for my store's fall sale to post on my store facebook page...:) https://www.facebook.com/SeasideDecorBoutique.
ReplyDeleteI've bookmarked your site already, very usefull info, i've also made my logo using this step-by-step guide, thanks for the great tutorial.
ReplyDeleteAlso please visit my site to see my new logo :D Internet Marketing Product Launch Review
Great post - I just discovered the collages function on PicMonkey the other day and love it. They include a template for FB cover images, too!
ReplyDeletedigital signature certificate
Thank you for the information, I think this article is very useful for all who read it.
ReplyDelete.
Snappa's drag-and-drop editor, it’s quick and easy to create your own graphics for blog posts, social media profiles and ads. The tool provides access to more than half a million free stock photos, 70,000+ vectors and shapes, and 200+ fonts. It's free to download up to 5 files per month, or $10 a month for unlimited downloads
ReplyDelete
ReplyDeleteSnappa's drag-and-drop editor, it’s quick and easy to create your own graphics for blog posts, social media profiles and ads. The tool provides access to more than half a million free stock photos, 70,000+ vectors and shapes, and 200+ fonts. It's free to download up to 5 files per month, or $10 a month for unlimited downloads
Snappa's drag-and-drop editor, it’s quick and easy to create your own graphics for blog posts, social media profiles and ads. The tool provides access to more than half a million free stock photos, 70,000+ vectors and shapes, and 200+ fonts. It's free to download up to 5 files per month, or $10 a month for unlimited downloads.
ReplyDeleteSnappa's drag-and-drop editor, it’s quick and easy to create your own graphics for blog posts, social media profiles and ads. The tool provides access to more than half a million free stock photos, 70,000+ vectors and shapes, and 200+ fonts. It's free to download up to 5 files per month, or $10 a month for unlimited downloads.
ReplyDeleteSnappa's drag-and-drop editor, it’s quick and easy to create your own graphics for blog posts, social media profiles and ads. The tool provides access to more than half a million free stock photos, 70,000+ vectors and shapes, and 200+ fonts. It's free to download up to 5 files per month, or $10 a month for unlimited downloads.
ReplyDeleteSnappa's drag-and-drop editor, it’s quick and easy to create your own graphics for blog posts, social media profiles and ads. The tool provides access to more than half a million free stock photos, 70,000+ vectors and shapes, and 200+ fonts. It's free to download up to 5 files per month, or $10 a month for unlimited downloads.
ReplyDeleteSnappa's drag-and-drop editor, it’s quick and easy to create your own graphics for blog posts, social media profiles and ads. The tool provides access to more than half a million free stock photos, 70,000+ vectors and shapes, and 200+ fonts. It's free to download up to 5 files per month, or $10 a month for unlimited downloads.
ReplyDeleteSnappa's drag-and-drop editor, it’s quick and easy to create your own graphics for blog posts, social media profiles and ads. The tool provides access to more than half a million free stock photos, 70,000+ vectors and shapes, and 200+ fonts. It's free to download up to 5 files per month, or $10 a month for unlimited downloads.
ReplyDeleteSnappa's drag-and-drop editor, it’s quick and easy to create your own graphics for blog posts, social media profiles and ads. The tool provides access to more than half a million free stock photos, 70,000+ vectors and shapes, and 200+ fonts. It's free to download up to 5 files per month, or $10 a month for unlimited downloads.
ReplyDelete